GraphQL is a query-based language that gives clients the power to ask for exactly what they need nothing more nothing less, makes it easier to evolve APIs over time, and enables powerful developer tools. To explain the concepts for this setup I will be creating a simple movies application using React.js. Below is the overview of the setup and various components I will be using to create this application.
Overview of the Application
The project will be divided into backend and frontend layers. MongoDB Atlas will be used to store data on the backend. Apollo GraphQL will be used to build API’s to query MongoDB backend. Apollo Client will be used to connect the API layer with the UI layer. This application will follow microservices architecture wherein new modules can be added on the go, without disturbing the current features.
Frontend : React.js+Apollo Client
Backend : MongoDB Atlas+Node.js+Express+GraphQL
Find the entire project here
React application setup
Step 1
Create a new folder for the application containing two subfolders frontend and backend. In the frontend folder create a new React.js project by executing the command below.
npx create-react-app movie-maker
After executing the command, a new React.js project is bundled in the frontend folder. In the next step let’s add components and containers and put in some React code.
Step 2
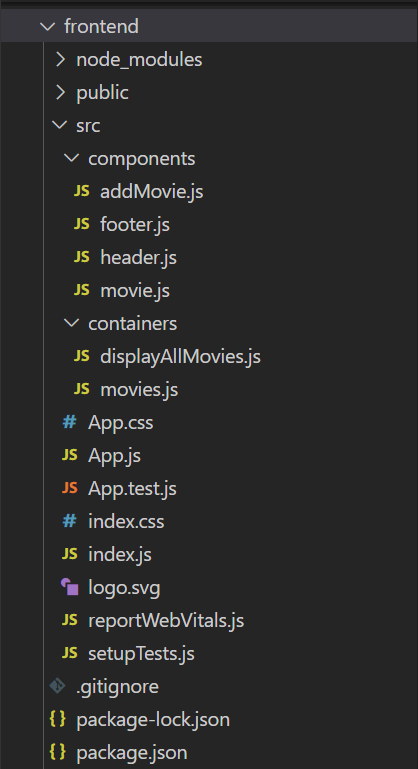
Add two more folders in the src folder namely container and components. The container folder will contain all the parent container elements for the screen whereas the component folder will be used to develop the display components for various sections on the screen. Add the relevant files and code by cloning the git repo. After adding the relevant files and code, your folder structure should look like the one below.

Step 3
Let’s add routing to our React application and also include the Apollo Client by executing the commands below inside the frontend folder.
#Apollo client
npm i --save @apollo/client graphql
#Adding react-router-dom and react-router-hash-link
npm i --save react-router-hash-link react-router-dom
We can add navigation functionalities to our react application using react-router-hash-link, and this is included as a part of the header.js component created in step 2:
import React from 'react'
import {HashLink as Link} from 'react-router-hash-link';
export default function Header() {
return (
<div className='topnav'>
<a className='logo' href='/'>Movie Maker</a>
<div className='search-container'>
<form>
<Link smooth to="#form">Add Movies</Link>
<input type='text' placeholder='Search movies...' name='search'/>
<button type='submit'><i className="fa fa-magnifying-glass"></i></button>
</form>
</div>
</div>
)
}
Next, lets setup the Apollo client and provide it in the index.js file created in step 1. Lets us also add routing capabilities to this application.
import React from 'react';
import ReactDOM from 'react-dom/client';
import './App.css';
import App from './App';
import reportWebVitals from './reportWebVitals';
import { ApolloClient, InMemoryCache, ApolloProvider, gql } from '@apollo/client';
import { BrowserRouter as Router} from 'react-router-dom';
const client = new ApolloClient({
uri: 'http://localhost:4000/graphql',
cache: new InMemoryCache(),
});
const root = ReactDOM.createRoot(document.getElementById('root'));
root.render(
<Router>
<React.StrictMode>
<ApolloProvider client={client}>
<App />
</ApolloProvider>
</React.StrictMode>
</Router>
);Note: GraphQL server setup is explained in step 6 and the server url is used as a parameter to the Apollo Client.
Step 4
Include all the components into the App.js component and complete the frontend project setup. Below are the contents of the App.js file.
import React from 'react'
import Header from './components/header';
import Footer from './components/footer';
import Movies from './containers/movies';
import AddMovie from './components/addMovie';
export default function App() {
  return (
    <div>
      <Header/>
      <Movies/>
      <AddMovie/>
      <Footer/>
    </div>
  )
}
Step 5
Let us now work on the setting up the backend layer with Node.js and GraphQL. For this application I am using Node v14.17.3. Install node.js via NVM here.
Before we move on with creating the node.js server let us provision a MongoDB cluster by following the steps here. For this application I will create a new MongoDB database titled Movie Maker.
Once the MongoDB cluster is created add your current IP Address to the Cluster and copy the connection string and keep handy. This connection string will be used to connect the Node.js server to MongoDB Atlas database.
You can read more about MongoDB Atlas here.
Now let us move on with installing the required packages for setting up the Node.js server. Create a new package.json file by following the steps here and install the NPM packages below in the backend folder.
npm i --save cors express mongoose mongodb graphql express-graphql
After installing all the packages successfully, the contents of your package.json file should look like the one below.
{
  "name": "backend",
  "version": "1.0.0",
  "description": "",
  "main": "app.js",
  "scripts": {
    "dev": "node app.js"
  },
  "author": "",
  "license": "ISC",
  "dependencies": {
    "cors": "^2.8.5",
    "express": "^4.18.1",
    "express-graphql": "^0.12.0",
    "graphql": "^16.6.0",
    "mongodb": "^4.9.1",
    "mongoose": "^6.6.0"
  }
}
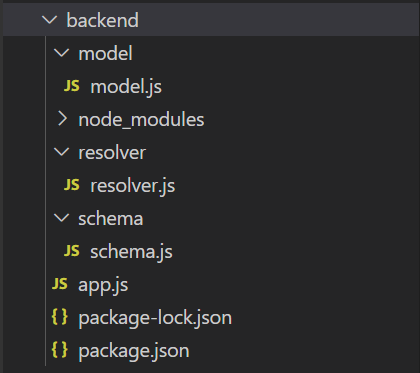
After installing the required packages create the folder structure as shown below, this will be our base setup for writing our GraphQL queries and setting up the node.js server.

Step 6
Let’s make use of the app.js file to create our node.js server. The contents of the app.js file is seen below.
const express = require('express')
const app = express()
const mongoose = require('mongoose')
const {graphqlHTTP} = require('express-graphql');
const movieSchema = require('../backend/schema/schema');
const resolvers = require('./resolver/resolver');
const cors = require('cors');
// Connect to MongoDB Atlas database
mongoose.connect('mongodb+srv://<username>:<password>@cluster0.qkydjsl.mongodb.net/?retryWrites=true&w=majority', {
useNewUrlParser: true,
useUnifiedTopology:true,
authSource:"admin",
ssl: true,
}).then(() => console.log('Mongo Connected'))
.catch(() => console.log('Error occured'))
// To avoid CORS erros while connecting to frontend
app.use(cors());
// Supply the GraphQL schema and resolvers created in step 7 and 8
app.use('/graphql',graphqlHTTP({
    schema: movieSchema,
    graphiql:true,
    rootValue: resolvers
}));
app.get('/',(req,res) => {
    res.send("Hello from node")
})
//Start the Node.js server
app.listen(4000, () => {
console.log("Listening on 4000")
})
Step 7
Let’s create and setup the movie schema in the model.js file by using the code below. Each movie will have a name, genre and year.
const mongoose = require('mongoose');const movieSchema = new mongoose.Schema({
name: String,
genre: String,
year: String
})module.exports = new mongoose.model('Movie', movieSchema);Step 8
Let’s create a resolver to fetch data from the MongoDB Atlas database using the code below:
const Movie = require('../model/model');const resolver = {
movies: () => {
return Movie.find({})
},
addMovie: (args) => {
let movie = new Movie({
name: args.name,
year: args.year,
genre: args.genre
})
movie.save();
return movie;
},
movieByName: (args) => {
return Movie.findOne({name : args.name});
}
}module.exports = resolver;
Step 9
Let’s define our queries and mutations as a part of the schema.js file using the code below:
const {buildSchema} = require('graphql')const movieSchema = buildSchema(`
type Query {
movies : [Movie],
movieByName(name: String!): Movie
}
type Mutation {
addMovie(name: String!, genre: String!, year :String!): Movie
}
type Movie {
        name : String,
        genre : String,
        year : String
    }
`)
module.exports = movieSchema;
Step 10
We have now completed the setup for our frontend and backend applications. Let’s start our dev servers for node.js and react as seen below.
React.js dev server

Node.js backend server

GraphQL (GraphiQL) server will be running on https://localhost:4000/graphql

If the setup is complete without any erros you will see data getting added under the movies collection in MongoDB as seen below.

If you enjoyed setting up your application and loved reading this article kindly share this article to a wider audience to help simplify the setup and spread knowledge.
About the Author
Joshua Salema is a Senior Practice Lead – Digital at Zimetrics, where he drives the strategy, growth, and delivery of cutting-edge digital solutions. With deep expertise in architecture and technology leadership, he ensures the design and implementation of secure, scalable, and future-ready systems that align with business goals. Joshua partners with clients and cross-functional teams to translate vision into execution, fostering innovation while upholding architectural best practices. Beyond his core role, he is passionate about mentoring talent, shaping high-performing teams, and contributing to the broader digital technology community through thought leadership and industry engagement.
